So you may be thinking the time has come to finally create your own website. Whether you’re an aspiring freelancer, solopreneur, small business owner, journalist, or just someone who sees value in having an online presence, having a website can be a great way to share your ideas, work, products, or services with the world.
When I started my own career consultancy business in 2013, a couple business coaches I will not mention by eche said I did NOT need a website to successfully run a service-based business. However, after spending most of my career in brand management & marketing, I didn’t buy that advice for one second.
Having a website creates a stamp of credibility and seriousness in a way a business card alone cannot. If you want to be taken seriously as a legitimate business owner or brand, you need a website. No question. Without my website, my business would have never been possible, and I’ve seen how having a website has helped my clients relaunch their own careers and businesses.
Article updated Nov 2021
If you want to be taken seriously as a legitimate business owner or brand, you need a website.
Sounds great, but where do I start?
 You might find the idea of having a website appealing, but may have no idea where to begin with actually creating it.
- How do I get a domain?
- How do I get my site online?
- How do I decide on a provider for the services I’ll need?
I know how overwhelming it can seem.
Creating my first website took me AGES. Beyond figuring out the actual mechanics, I also had to select from the hundreds of service providers out there. Then, I had to figure out a way to actually build the thing. I spent countless hours on phone support lines, online forums, and email exchanges with my developers.
Here’s the good news. You absolutely CAN do this.
Take it from someone who’s not super technical with web development. However, I eventually figured it out. From all the hundreds of hours I’ve invested tinkering, reading, and researching to educate myself and my clients on how to do this, I’ll break the process down to make it as easy and painless as possible for you.
This article is not meant to be a completely comprehensive, technical guide. Instead, it’s meant to be a practical, plain language roadmap for non-technical types with a clean, simple path toward creating your first website. I’ll also suggest simple platforms and providers robust enough to accommodate your evolving needs.
Setting up a website is sort of like building a home, so I’ll use that metaphor throughout to clarify what’s going on.
Note, I’ve included a few affiliate links below, but I only recommend services and products I select and trust for my own business only after extensively researching and trying out others.
1. Choose a domain name
 One of the biggest decisions you’ll make when creating your website is the name of your domain. This is a BIG decision because your domain name will be a big part of your brand identity. Like a business name or house name people see or look up in a directory. You will also use this name across social media platforms.
You need to decide on 2 things:
- The “second level domain”. The main identifier or “name” of your site.
- The “top level domain” (TLD). The letters at the end of a web address. The most common TLDs are .COM, .NET, and .ORG. .CO is also gaining in popularity as an alternative to .COM.
For example, with my site josephliu.co, “josephpliu” is the second level domain, and .com is the TLD.
Your domain name will be a big part of your brand identity.
For personal branding purposes and control, I recommend securing your FirstnameLastname.com, which tends to provide the most versatility and improve your Google search rankings when people search for your name. The beauty is that your name can serve as an umbrella brand no matter what services or products you choose to offer in the future. So I have josephliu.co as my main site, although my legal company name is ILUMITY.
If you’re trying to build a personal brand, I recommend you secure your FirstnameLastname.com.
You can check whether your desired domain is available using NameCheap, my registrar of choice (more on registrars in the next step). You should also consider whether the second level domain name you’re planning to use is available across other social media networks, something I describe in Social Media User Names & Domain Names You Should Secure.
If your name isn’t available, you can throw a middle initial in there, something I do myself. I’d avoid hyphens, strange spellings, or unnecessary numbers, which tend to look a bit more amateur and dated.
If you decide NOT to use your own name, and you need some help coming up with a site name, here are some useful tools I’ve used:
- Domain name generators like Looka Business Name Generator or WebSitePlanet help you come up with ideas of available domains based on words you want in your name
- Username checkers like Namechk allow you to quickly see if your domain name is also available across other social media platforms, like Facebook, Twitter, and YouTube.
- Crowdsource your name with Squadhelp or Crowdspring by running a contest describing your business to get input from Creatives around the world.
- This article by Chris Wagner on Domain Name Generators provides a few other suggestions on some useful online tools to generate name ideas.
2. Register your domain
 To secure your desired domain name, you need to register it with a domain name registrar. This “reserves” the name for as long as your registration period, during which you are the sole owner of this domain. It makes things official, and prevents someone else from grabbing your desired name. Sort of like officially claiming your address so no one else can use it. If your idea for a domain is available, I’d grab it right away before someone else does.
There are tons of domain registrars out there. I now use Namecheap for all my new domain registrations and recommend it to all my clients because they offer a user-friendly interface, solid customer support, and competitive prices.

Find a domain starting at $0.88
powered by Namecheap
Previously, I used GoDaddy. Their first-year promotional registration fees are lower than Namecheap’s. However, their renewal fees are higher than Namecheap’s, and they constantly try to upsell you, which is tiring. Therefore, if you intend to own your domain for more than 1 year, you’ll spend less with Namecheap. Other reasons why I recommend Namecheap:
- Lifetime WHOIS privacy included: Since May 29, 2018, Namecheap has offered free lifetime privacy protection on all domains purchased through them, which is a huge bonus if you don’t want your personal contact information visible in public WHOIS records. GoDaddy charges an extra annual fee for this.
- Reliable DNS: To date, Namecheap’s Domain Name Servers have not been hacked, but GoDaddy’s HAVE been hacked.
- Custom DNS included: Namecheap offers free custom nameservers (if you ever need them). GoDaddy does not.
- Email forwarding included: Namecheap does not charge for email forwarding. GoDaddy does, unless it happens to be included in an offer bundle.
- Simplicity: Namecheap’s dashboard is clean and simple. With GoDaddy, I often got lost amidst their complex screens and options.
- Professional brand image: As a branding guy, I care about brand image. Namecheap has a very neutral brand image, so I can proudly recommend it to clients. With GoDaddy, I didn’t love being associated with a brand often associated with Super Bowl ads featuring scantily clad women.
- Fantastic customer service: Although they don’t offer a technical support call center like GoDaddy, Namecheap’s 24/7 online chat and support team are phenomenal. Also, I got tired of GoDaddy constantly trying to upsell me every time I called in. And I do me EVERY time.
3. Select web host
 Once you have your domain and CMS platform selected, you need a place to house your content. That means you need a “host” for your domain. The host provides you with online space where you can build and store your website content. Sort of like a plot of land where you can build your house. If you want total control of your website and maximum versatility, purchase web hosting so you can “self-host.”
You don’t HAVE to buy hosting. For example, WordPress.com enables you to create a free blog or website without having to buy hosting. WordPress.com is like renting your home on the internet, whereas self-hosting is like owning your home. And as is the case when you rent, while you may be able to hang a few photos and bring in your own furniture, you’re not really allowed to paint, modify, or fully customize your home the way you want. When you own, it’s yours. You can do what you want.
Same with hosting. When you self-host, you can do what you want. WordPress.com doesn’t allow you to add in things like plugins, which really expand the capabilities of your site. If you self-host, you can add plugins. With WordPress.com, you’re also stuck with “wordpress” in your domain name (e.g., domainname.wordpress.com) unless you get on a paid WordPress plan anyway. With self-hosting, you can use any custom domain you own.
If you want total control of your website and maximum versatility, purchase web hosting.
If you’re looking for a good hosting provider, I’d recommend A2 Hosting, the host I’ve used myself for years because of the excellent speeds, customer service, back-up features, user-friendly interface, and green servers. Several developers also recommended them to me.
In the past, I used GoDaddy, but quickly got tired of their nonstop upselling and price inflation. I’ve investigated and trialed many others including DreamHost, Host Gator, WP-Engine, Host Papa (the list goes on). A2 just offered the best combination of service, performance, and value all around. I couldn’t be happier with them. Plus, they’re located in Ann Arbor, Michigan, where I did my MBA. Go Blue! However, if you want to explore other options, this article WPKUBE article outlines a few solid hosts (including A2).
4. Point domain to your Host
 This is where things got a little tricky for me, so I’m going to break it down for you. You now need to point your domain to your host. Sort of like directing people who look up your address (your domain) to your plot of land (your host) where your new home will be built.
To do this, go to your domain registrar and set the Domain Name Servers (DNS) of your domain to the Nameservers provided by your host.
Whoa! What? Slow down there, Joseph!
Okay, this process is different for each registrar and host. If you Google “DNS servers + [host provider’s name],” you can likely find instructions on this. With Name Cheap and A2 Hosting, it’s super simple to do in 2 steps.
Step 1: Get your DNS settings from your host. You may receive this in a welcome email, or you can easily find it by searching their knowledge base or asking their customer service team. With A2, it’s super simple. I received the DNS settings in my welcome email, but could also easily look them up in their knowledge base.

A2 DNS settings from knowledge base article
Step 2: Add those DNSs into your domain settings with your domain registrar. For example, with NameCheap, it looks like this:

NameCheap DNS settings
The DNS can take about 24-48 to kick in. If you get stuck, you can always turn to your registrar’s or host’s customer service. They should be able to help.
5. Select a Content Management System
 Assuming you want the flexibility to control and update your own website content, you’ll need a Content Management System (CMS). For example, you may want to change a picture or write a new blog post without having to turn to a web developer for every single update. Think of it like your own personal interior decorator or architect to help you erect your house and decorate it as you wish.

For my most my business owner clients, I recommend WordPress.org. It’s the most popular CMS in the world, something I’ve used as an independent business owner, but also the CMS our design and web agencies used when I managed large, multi-national consumer brands. It’s really the industry standard, and you really can’t beat the versatility, flexibility, and user-friendliness of the platform.
Jan 2018 Update: If you go with WordPress, you can also rest assured that you’re going with a platform that Google has decided to invest resource into optimising for performance and discovery.
I recommend WordPress as a Content Management System for its versatility, popularity, and control.
In case there’s any confusion, WordPress.COM is the free 3rd party site where you can create a free site. WordPress.org is the actual CMS software you install onto a website, after you’ve paid for hosting.
I drifted from WordPress for a year, using the New Rainmaker Platform, which ended up being a total nightmare for a whole host of reasons, mostly due to lack of control. If in doubt, go with WordPress. But don’t take my word for it, this article by WP Explorer is one of the best out there, outlining why WordPress is the way to go.
- I’ve heard good things about Squarespace (which supposedly takes a lot of the guesswork out of the process), but WordPress gives you more control. Refer to this WPKUBE Squarespace vs. WordPress article to learn more about the differences.
- Avoid platforms like Wix or Weebly too, which may seem attractive on the surface because they claim to simplify the website building process, but the lack of control and versatility may eventually catch up to you.
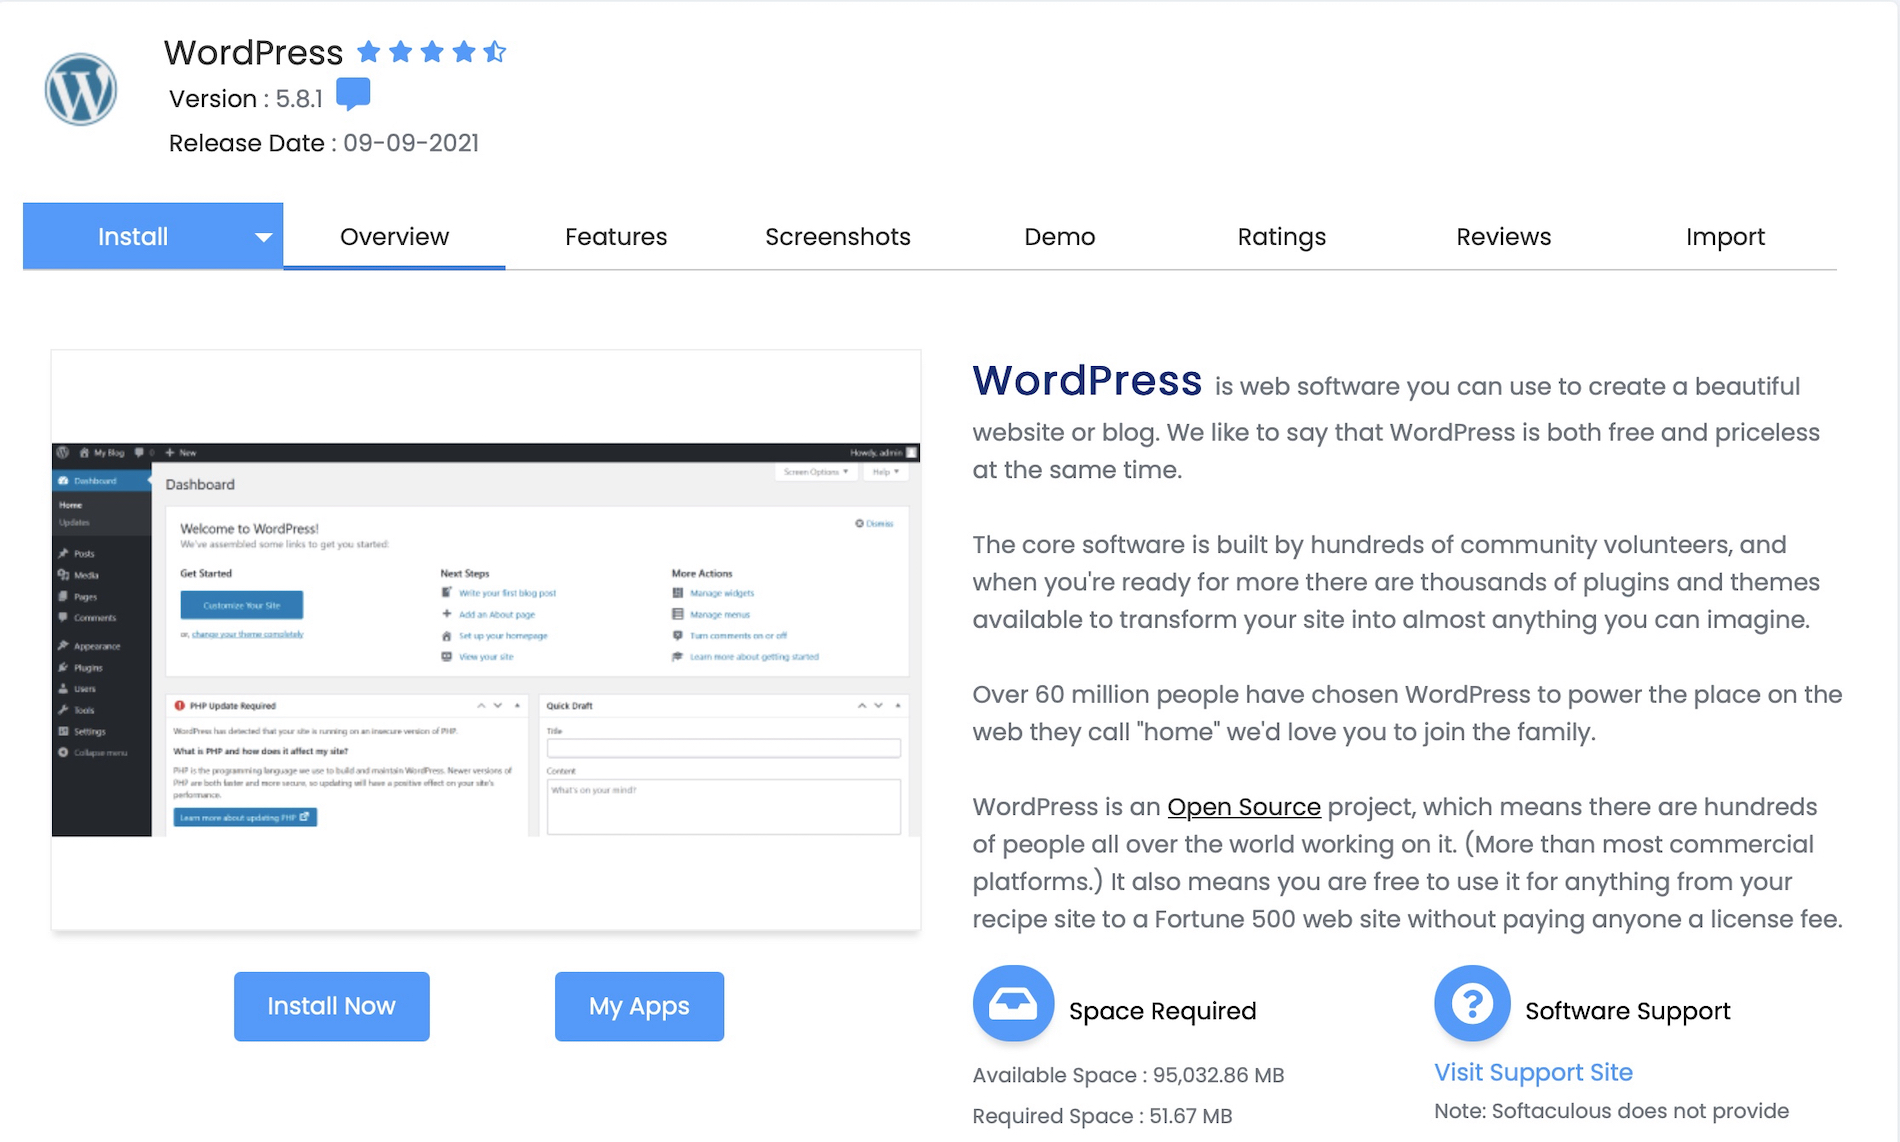
6. Install CMS onto your site

Assuming you go with WordPress, you now need to “install” its CMS onto your site. This creates the basic framework and management system you will use to customize and control your site. Think of it like erecting the frame of your house and getting all the building tools and materials into the garage.
There are automatic & manual ways to do this. You can bring them in one piece at a time, or you can drop the entire thing down in one fell swoop. I prefer automatic because, well, it’s just easier. With most reputable hosts, they provide a “1-click” WordPress Installation via a system called cPanel, where you can control all the inner workings of your site. You can ask your host provider for these instructions (A2 example).
For example, with A2, I do this directly from my cPanel:
 You’ll get asked to specify a few things like your site name, description, and login details (these can be adjusted later) Some hosts also provide other enhancements or options. Be sure to note your Admin Account details, which is how you’ll log in to manage your site.
After you install, your site should then be live. Try typing in your domain, and a basic site should appear.
7. Select a theme & start building
 Now that your site is up, you can:
- Login– typically, your login page will be something like yourwebsite.com/wp-admin, but if that doesn’t work, you can get the login URL from your host provider.
- Select a theme– Go to Appearance -> Themes in the side menu, then click “add new” at top. You can go with the default WordPress theme or select from the multitude of themes offered within WordPress or consider a 3rd party provider like Themeforest. For more details, WPKUBE has a fantastic article on How To Install And Set Up A WordPress Theme.
- Create your content– Create some Pages and Posts. WordPress explains the difference here. If you’re just getting started, a Home, About, and Contact can suffice.

Finally, how much this cost to create a website?
As is the case with many business endeavours, you can either take a scrappy, less expensive or a more comprehensive, expensive route. If you’re like me, and you’re primarily a one-person operation, you may not have the appetite or means to blow tons of money on a website. However, keep in mind your website is going to be one of the first impressions you have on a client, customer, or collaborator researching you online. Therefore, you want to invest enough into this to ensure it reflects the kind of personal brand you want to create for yourself. And some upfront investment can save you a lot of headache and hassle down the road.
Bare minimum, you’ll need to pay for your domain registration, hosting, and (if you choose to go down this route), fees to have someone design and develop your site. All in, assuming you do want to hire a developer, you’re looking at spending at least $1000 from start to finish if you want it done right. If you try to do everything on your own, you’re really only looking at fees associated with domain registration and hosting, so you could do it for much less.
Personally, from experience, unless you actually know the ins and outs of web development, I’d say the investment of hiring an actual web designer and developer is worth it rather than trying to tinker with it yourself. This article by design shack breaks down the costs of creating a website very clearly. If you need a recommendation of any good developers, feel free to contact me.
Now, start building your site!
That’s it! Okay, that’s actually just the beginning. Now that your basic site is set up, you can begin building up your content, customizing your site, and creating your online brand presence. If you want more guidance on how to set up your WordPress website, also check out these 7 Vital Steps to Take Before Launching a WordPress Website, a solid, useful article by WP Explorer.
If you eventually decide to take your website to the next level of design and function, you could also consider using website builders or even hiring a professional developer (which is what I did). A2 has a great article on how to decide between the two.
I hope this guide has been useful for you, and if you have any questions or feedback on how my process worked for you, I’d welcome your comments. Good luck, and enjoy creating your own personal brand!
Download your website setup cheat sheet
For a summary of these steps, recommended providers, and resources, download your free “Website Setup Cheatsheet” that includes a 1-page recap of these steps.


I actually bookmarked this page, such a handy article to keep. It can’t get simpler than this, thanks for sharing your thoughts!
Yohan, happy to hear you found this useful!
Really appreciate the breakdown! Creating a website is always a great idea! Still important to consider all the back-end stuff
Glad you found it useful. Yes, the backend setup is as important as what people see on the frontend, so worth getting all your technical ducks in a row at the start so you don’t have to go through the painful process of what I went through to switch platforms and providers later, which is a pain.